
Heltec Wifi LoRa 32 V3 With Case V4 ESP32 Oled SX1262 0.96 Inch Blue OLED Display


Heltec Wifi LoRa 32 V3 With Case V4 ESP32 Oled SX1262 0.96 Inch Blue OLED Display
SPECIFICATIONS
Accessory Type: USB To DC Cable
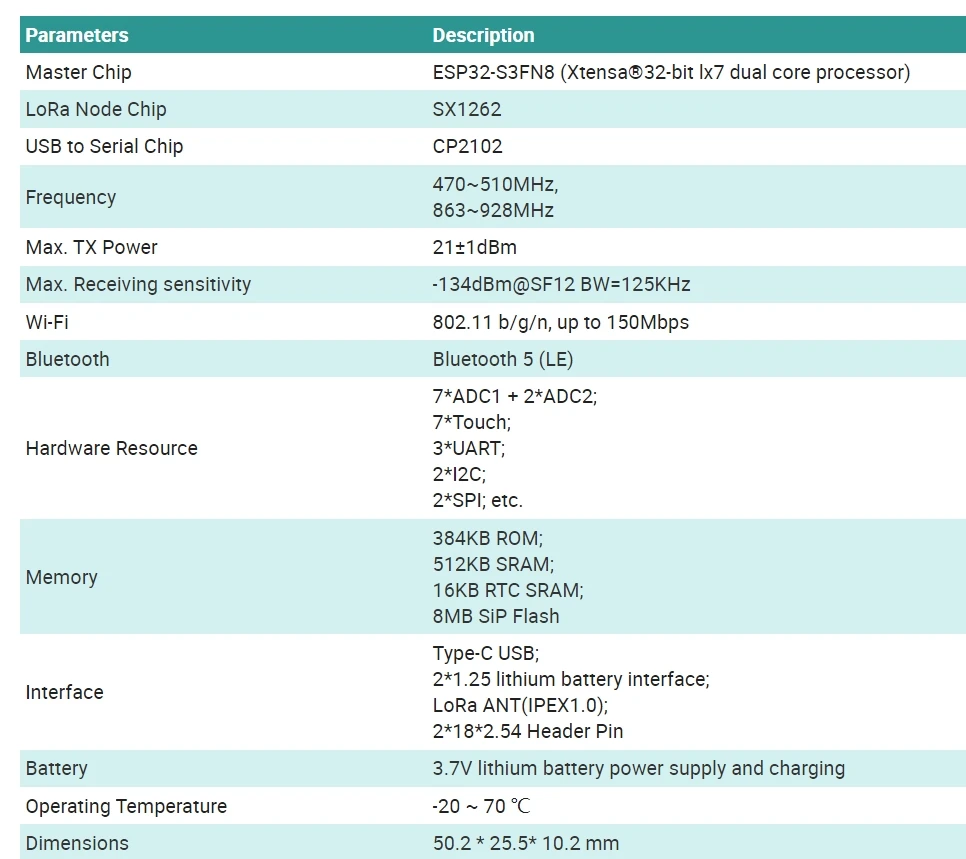
Battery: 3.7V lithium battery power supply and charging
Battery Included: no
Bluetooth: Bluetooth 5 (LE)
Brand Name: Heltec Automation
Certification: CE,FCC
Compatible With: Lora32
Demo Board Type: RISC-V
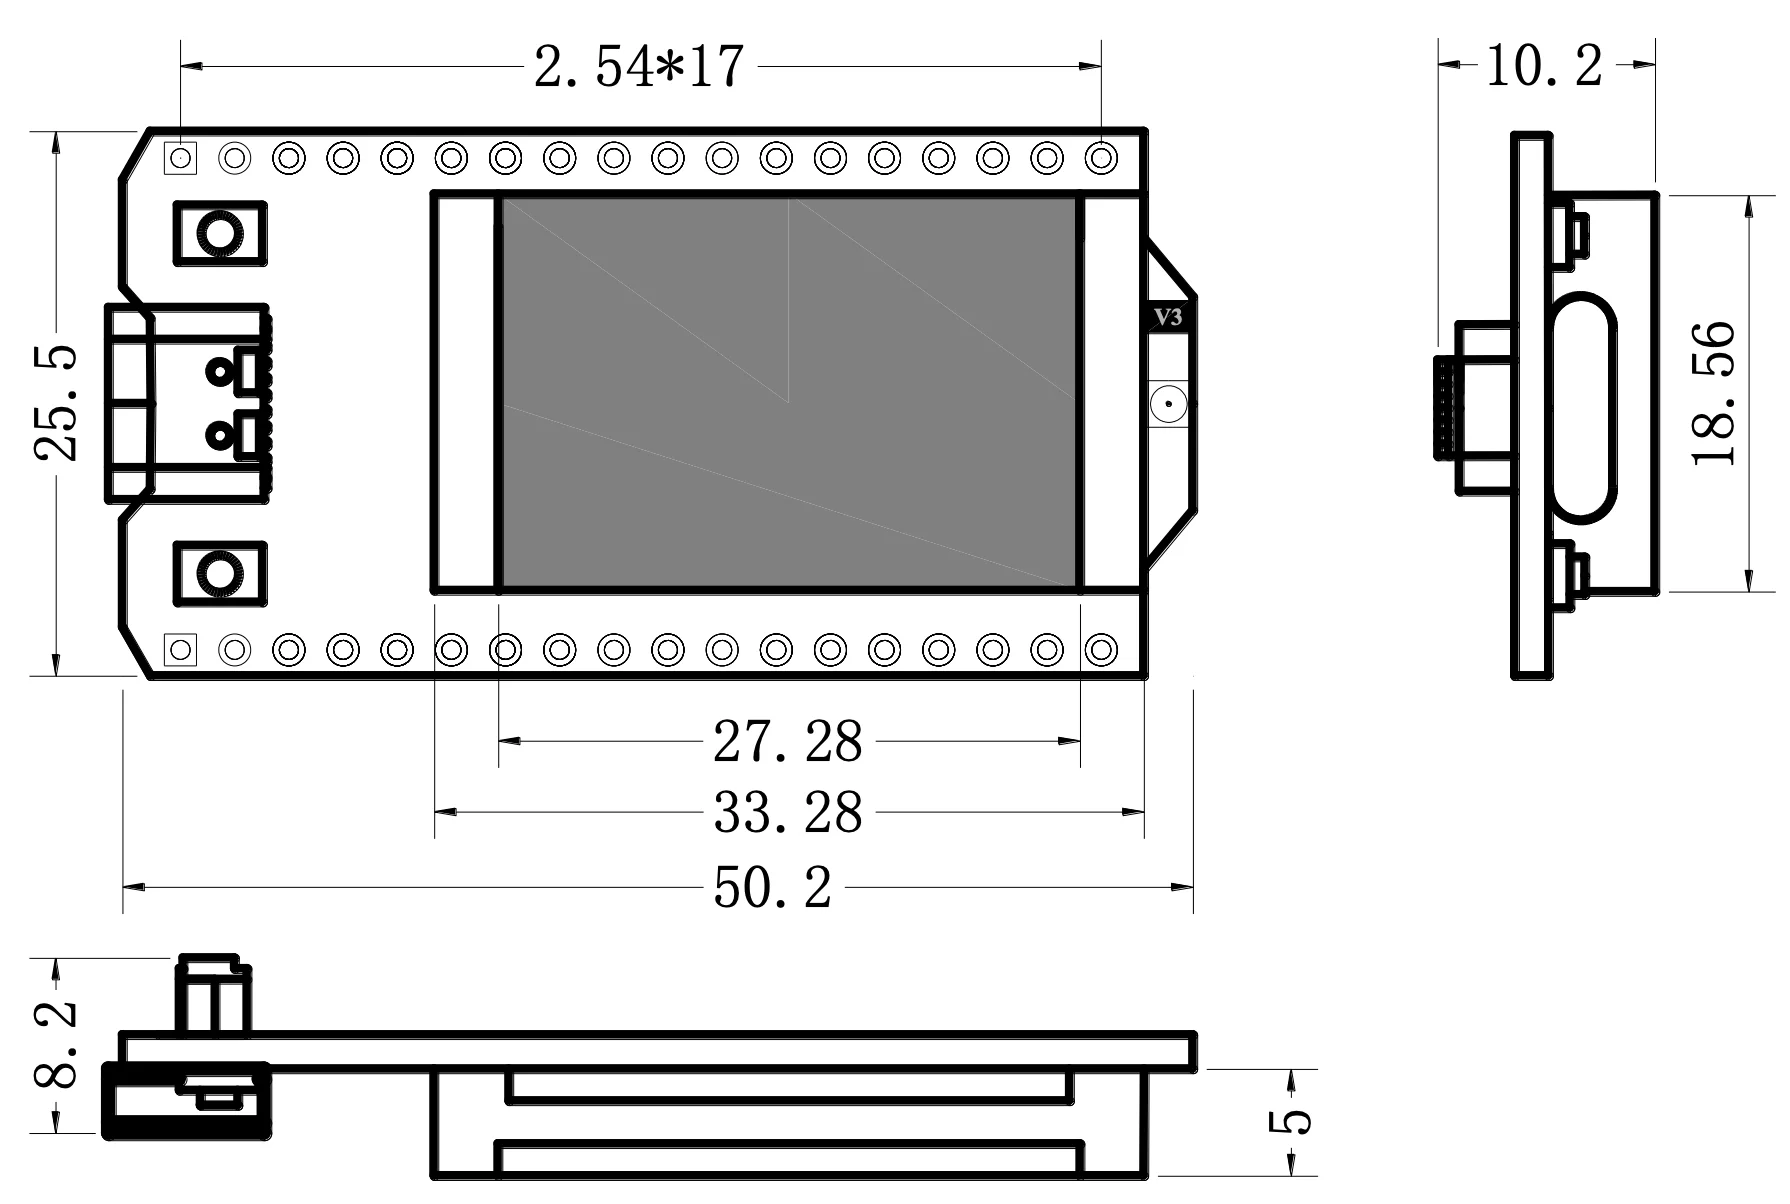
Dimensions: 50.2 * 25.5* 10.2 mm
Frequency: 470~510MHz, 863~928MHz
Function: ESP32 LoRa WiFi BLE
High-concerned chemical: None
Intergrated Feature: WiFi 802.11b/g/n,bluetooth
LoRa Node Chip: SX1262
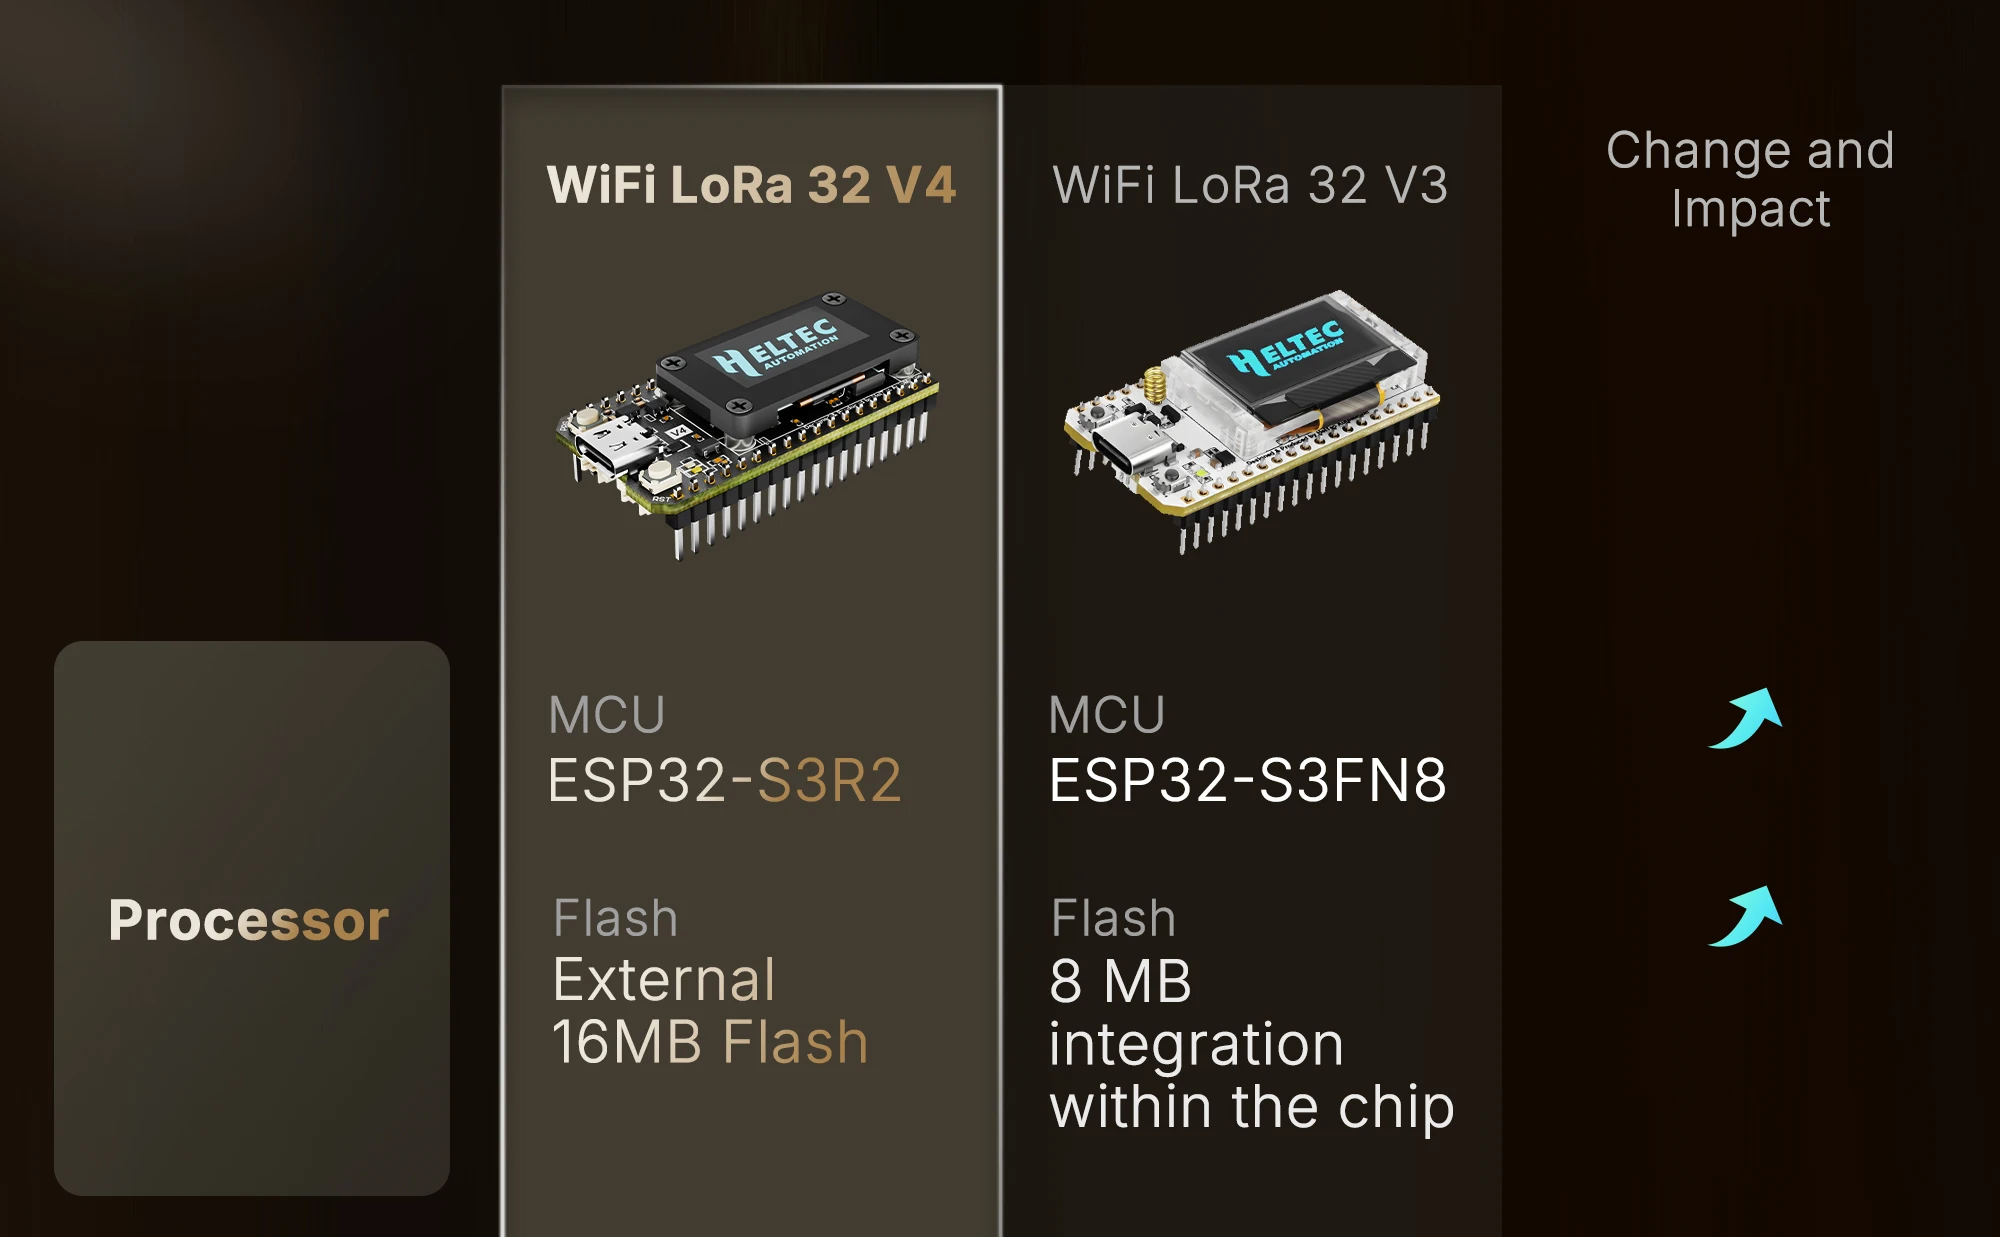
Master Chip: ESP32 S3FN8 (Xtensa 32 bit lx7 dual core processor)
Max. Receiving sensitivity: -136dBm@SF12 BW=125KHz
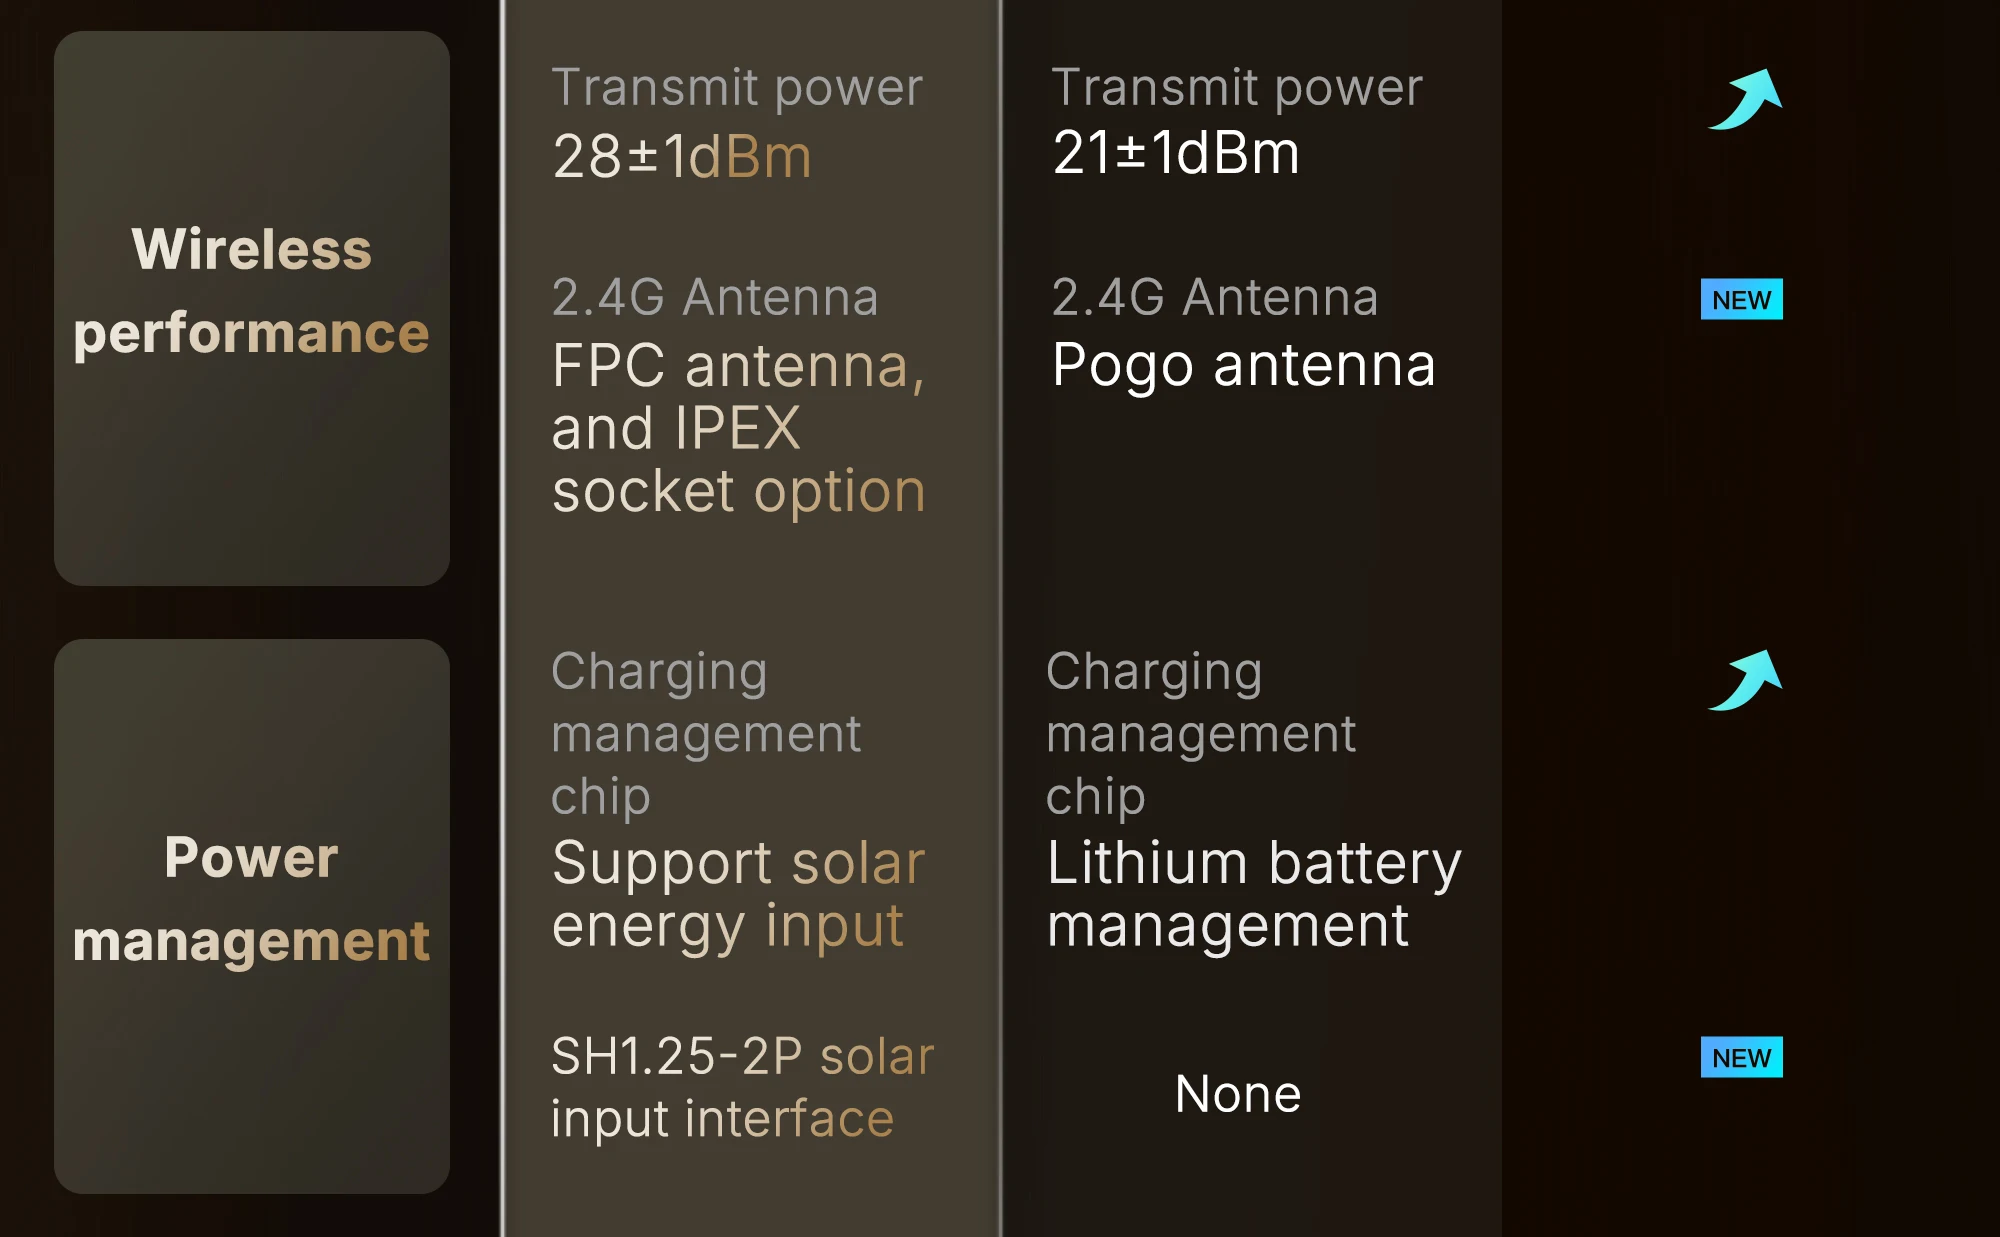
Max. TX Power: 20±2dBm
Origin: Mainland China
Supported: meshstatic
Typical Application Fields: Internet of Things (IoT)
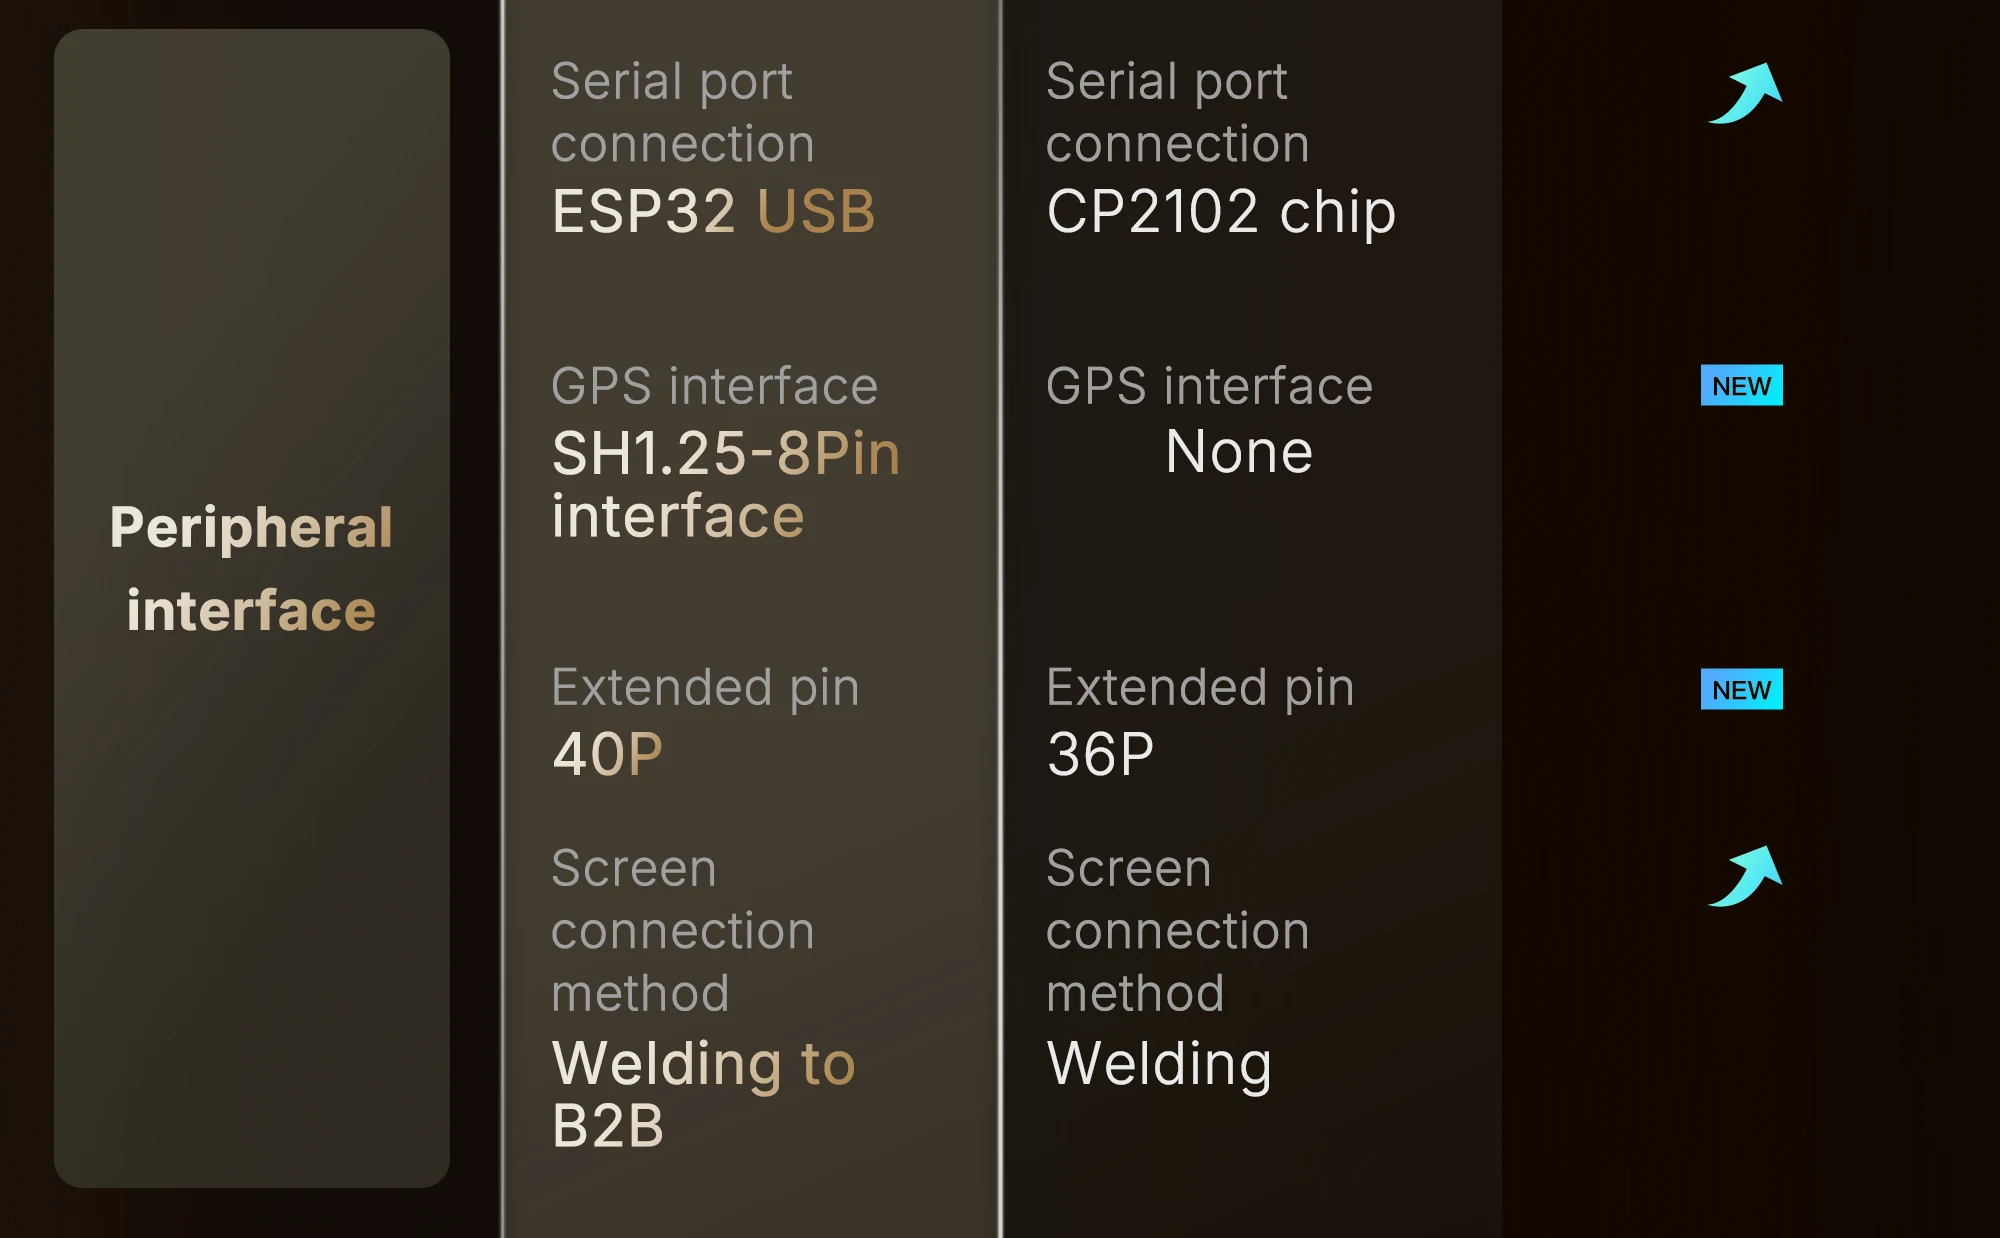
USB to Serial Chip: CP2102
Wi-Fi: 802.11 b/g/n, up to 150Mbps
Summary
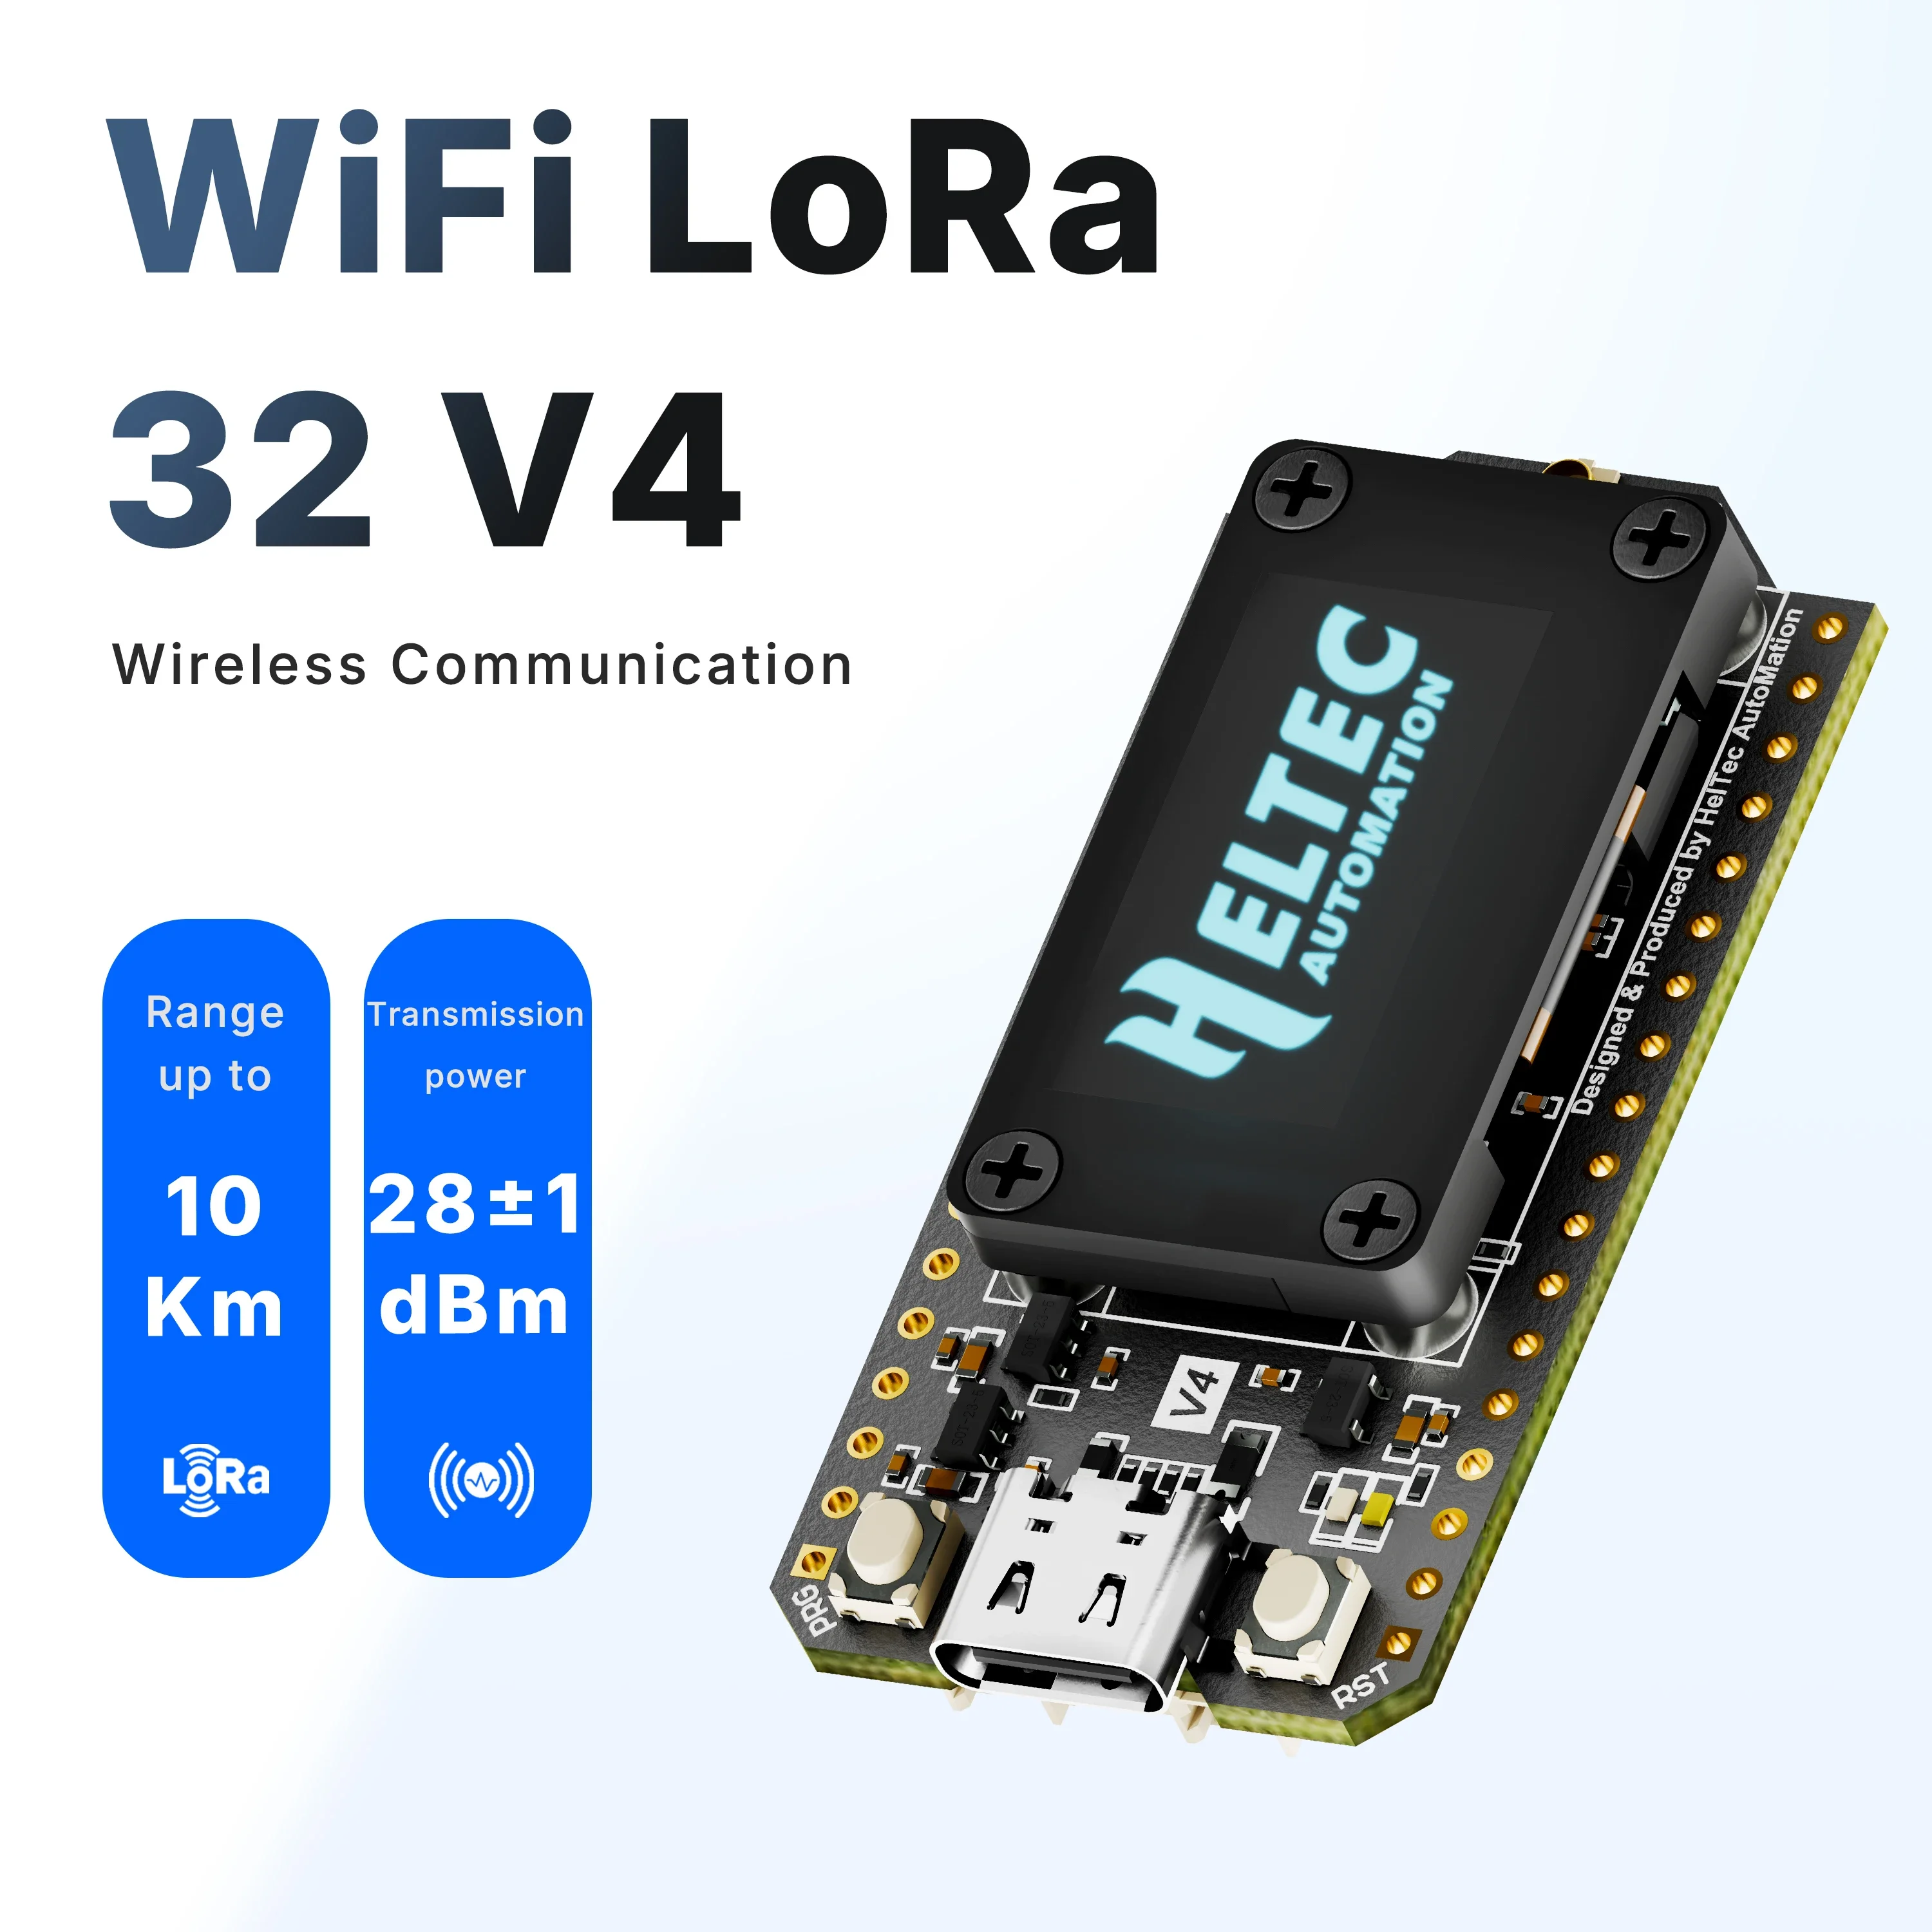
●WiFi LoRa 32(V3) is a classic IoT dev board designed & produced by Heltec Automation.
●Since its launch in 2017, it has been loved by developers and makers.
●Widely used in numerous excellent open-source projects and directly made into products for LoRa/LoRaWAN features.
●The newly launched V3 version has the same pin sequence as the V2 version and retains Wi-Fi, BLE, LoRa, OLED display, and other functions.
●It is the best option for smart cities, farms, homes, industrial control, house security, wireless meter reading, and IoT developers.
Heltec LoRa 32 V3 with Meshtastic Video
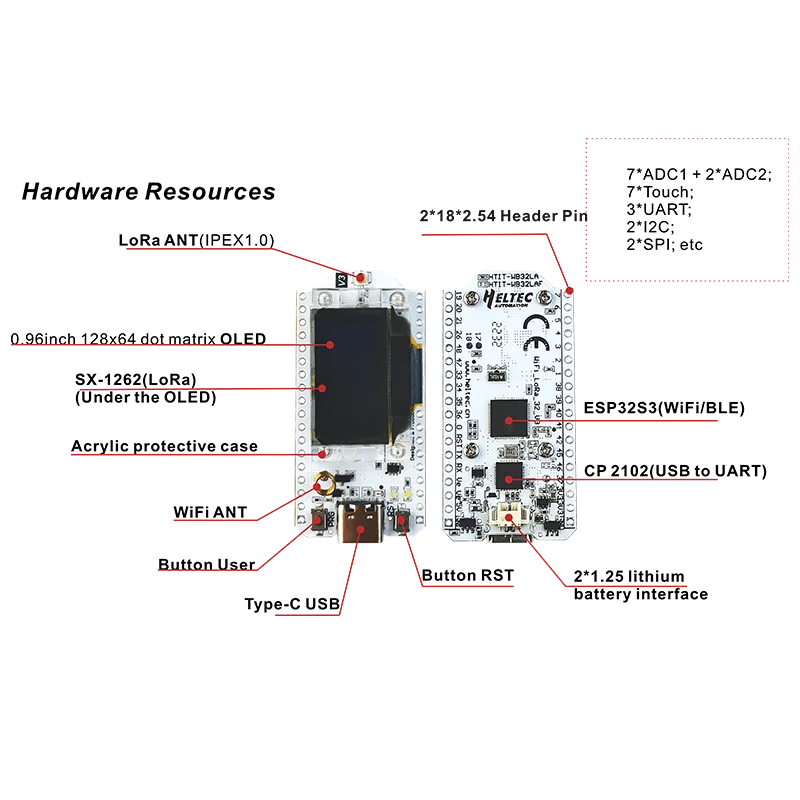
Main Features
● Microprocessor: ESP32-S3FN8 (Xtensa® 32-bit LX7 dual-core processor, five-stage pipeline rack Structure, frequency up to 240 MHz).
● SX1262 LoRa node chip.
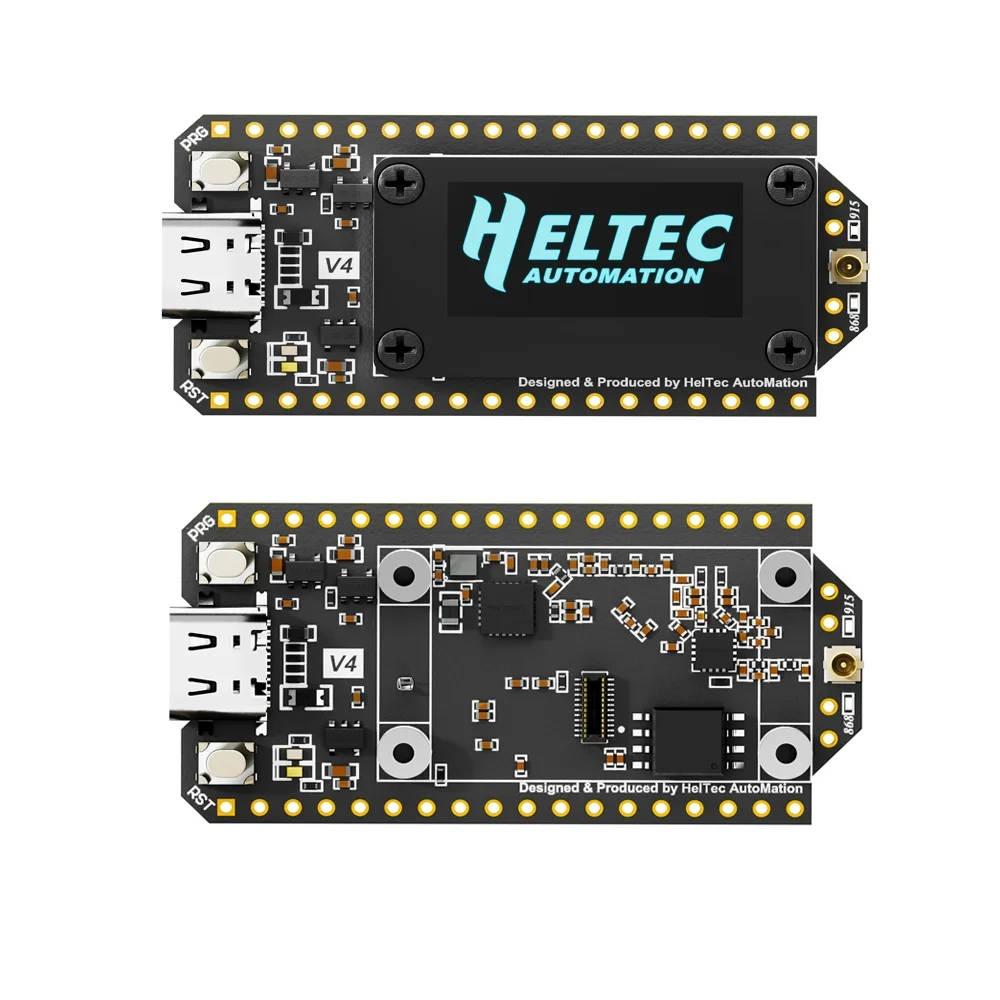
● Type-C USB interface with a complete voltage regulator, ESD protection, short circuit protection, RF shielding, and other protection measures.
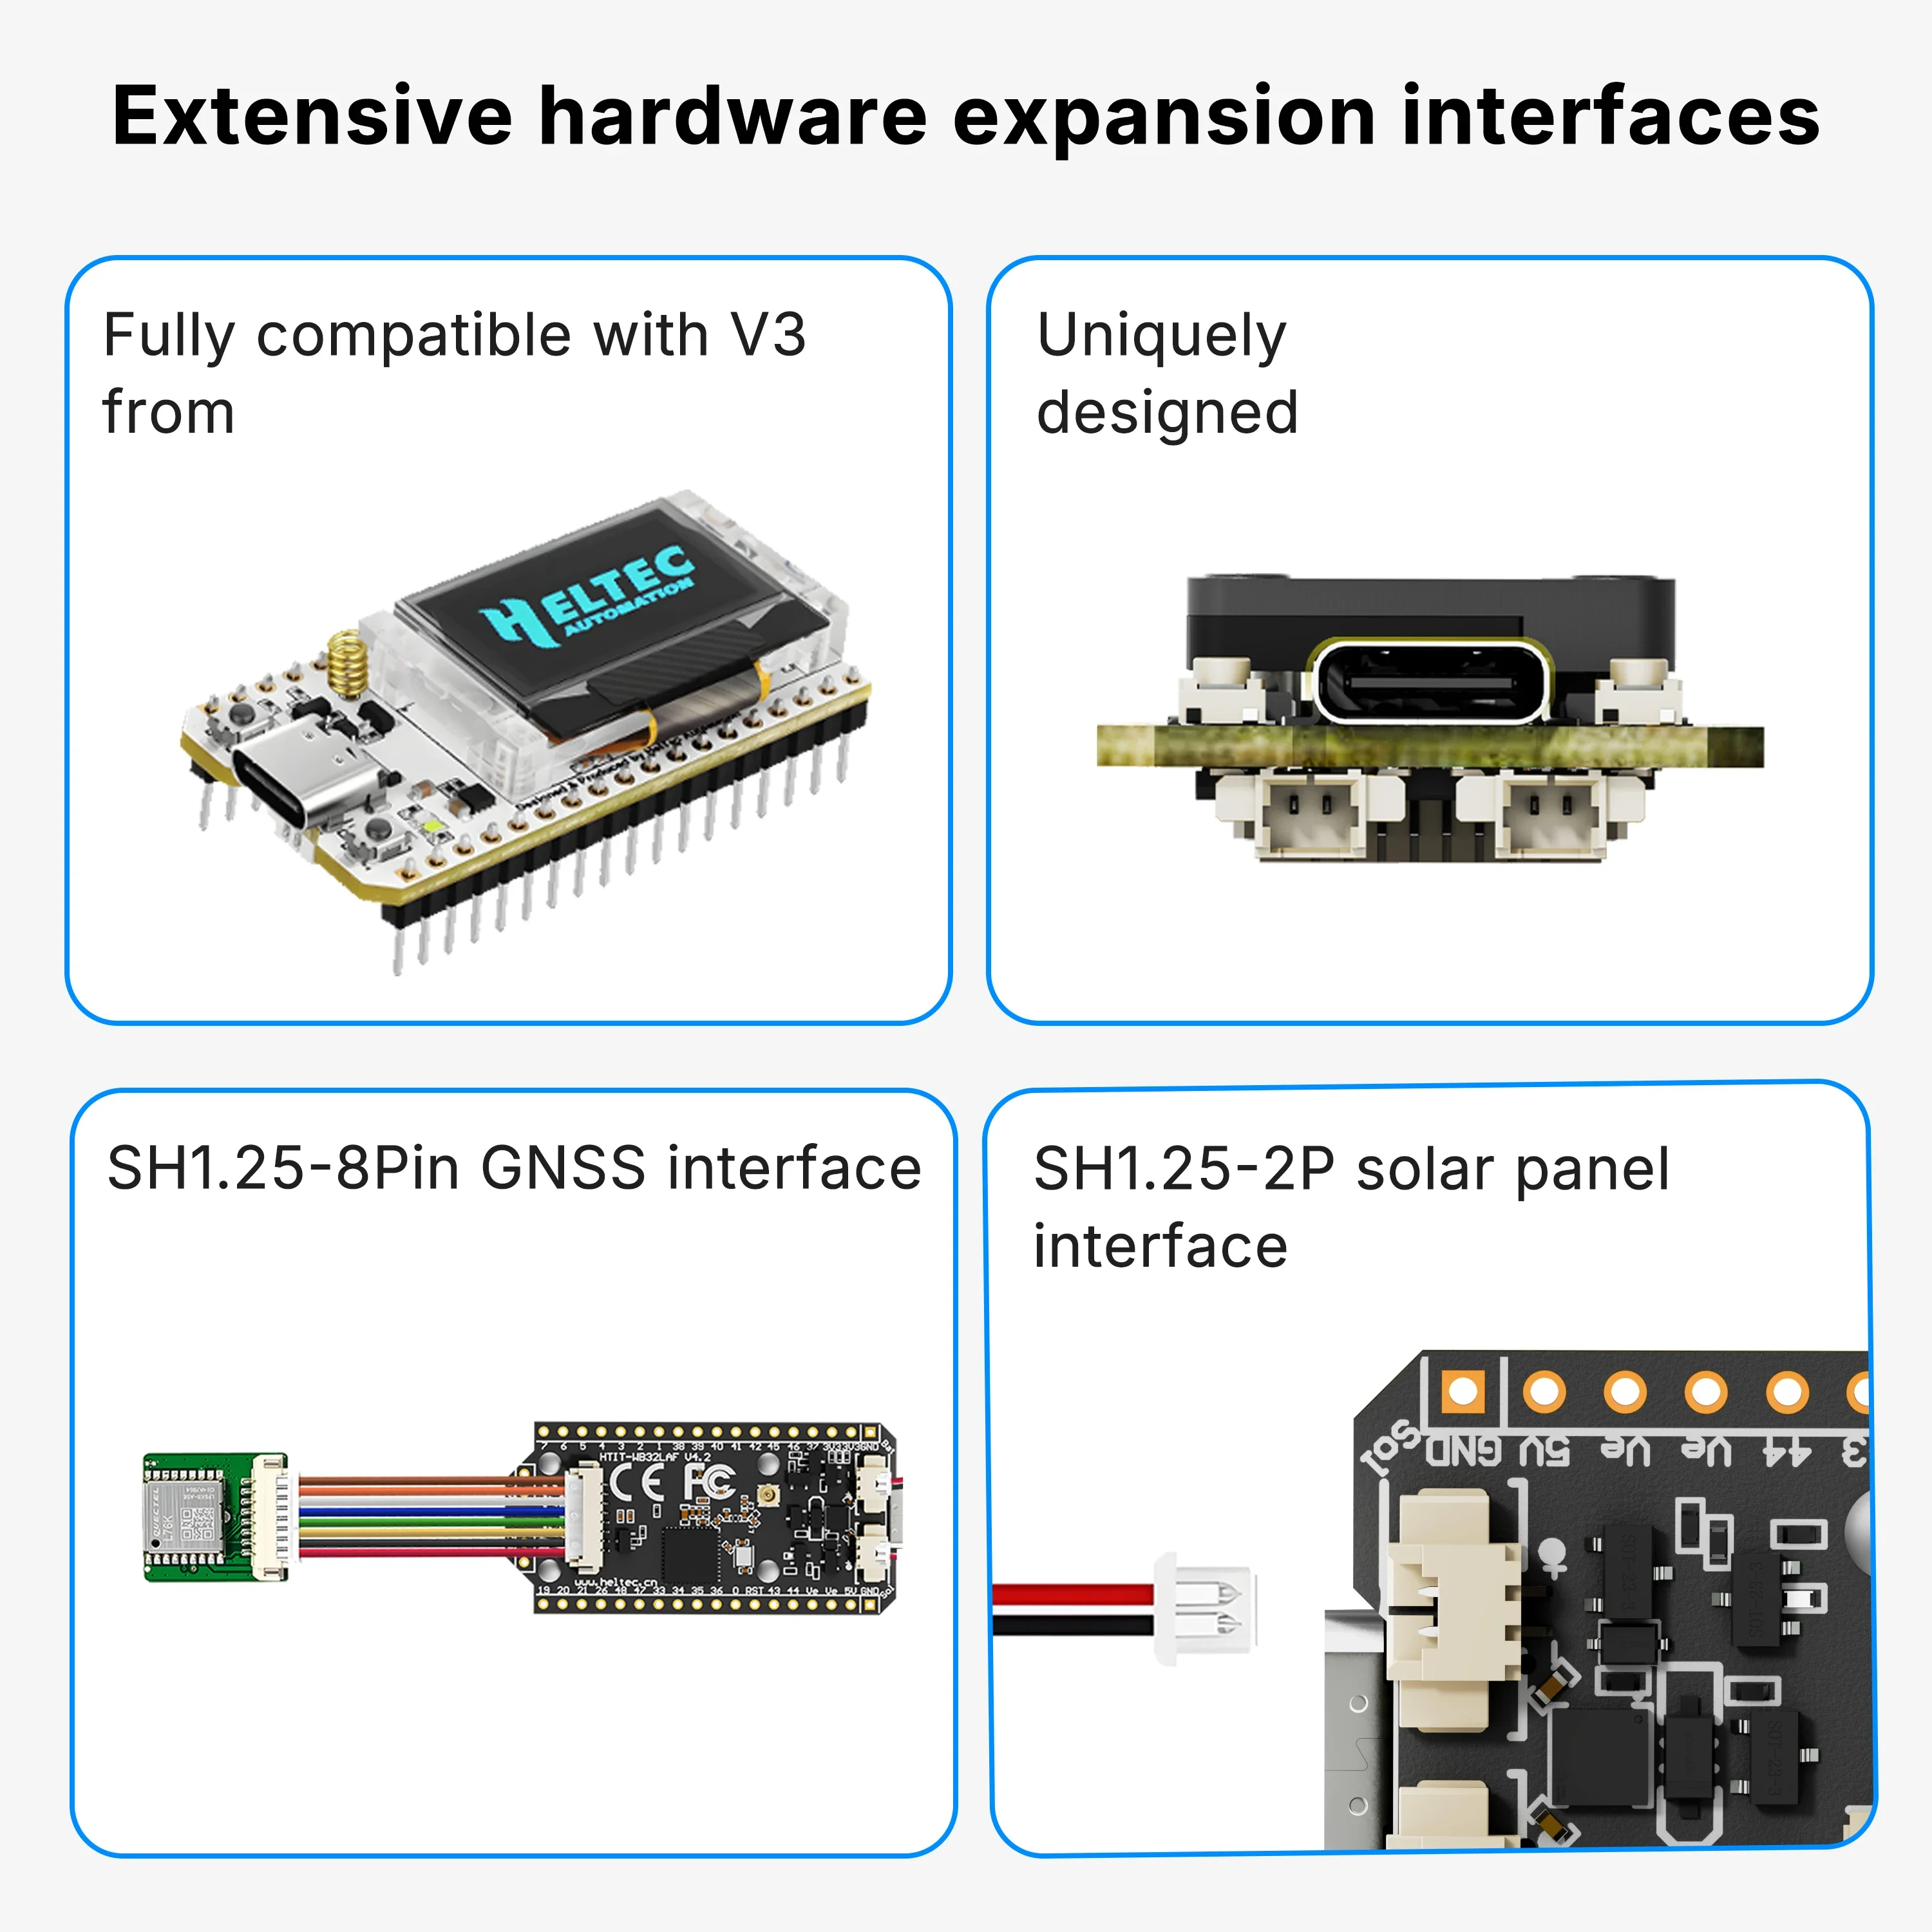
● Onboard SH1.25-2 battery interface, integrated lithium battery management system (charge and discharge management, overcharge protection, battery power detection, USB / battery power automatic switching).
● Onboard 0.96-inch 128*64 dot matrix OLED display can be used to display debugging information, battery power, and other information.
● Integrated WiFi, LoRa, Bluetooth three network connections, onboard Wi-Fi, Bluetooth dedicated 2.4GHz metal spring antenna, reserved IPEX (U.FL) interface for LoRa use.
● Integrated CP2102 USB to serial port chip, convenient for program downloading, and debugging information printing.
● Support the Arduino development environment.
● With good RF circuit design and low-power design.
WiFi LoRa 32 is compatible with the following open-source projects:
●...
We also provide a standard ESP32 Arduino LoRaWAN library:
This library is already included in the Heltec ESP32 Arduino Framework by default.
Resource
●WiFi LoRa 32 V3 details on Heltec website
●Heltec ESP32 Arduino Framework(Include ESP32 Arduino LoRaWAN library)
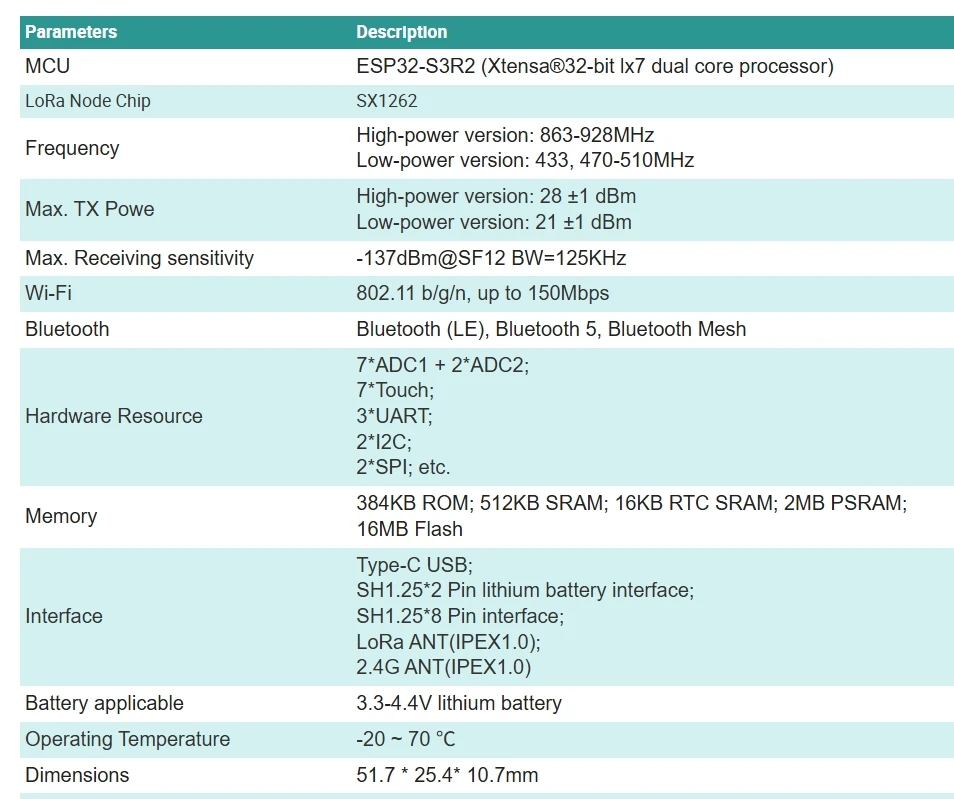
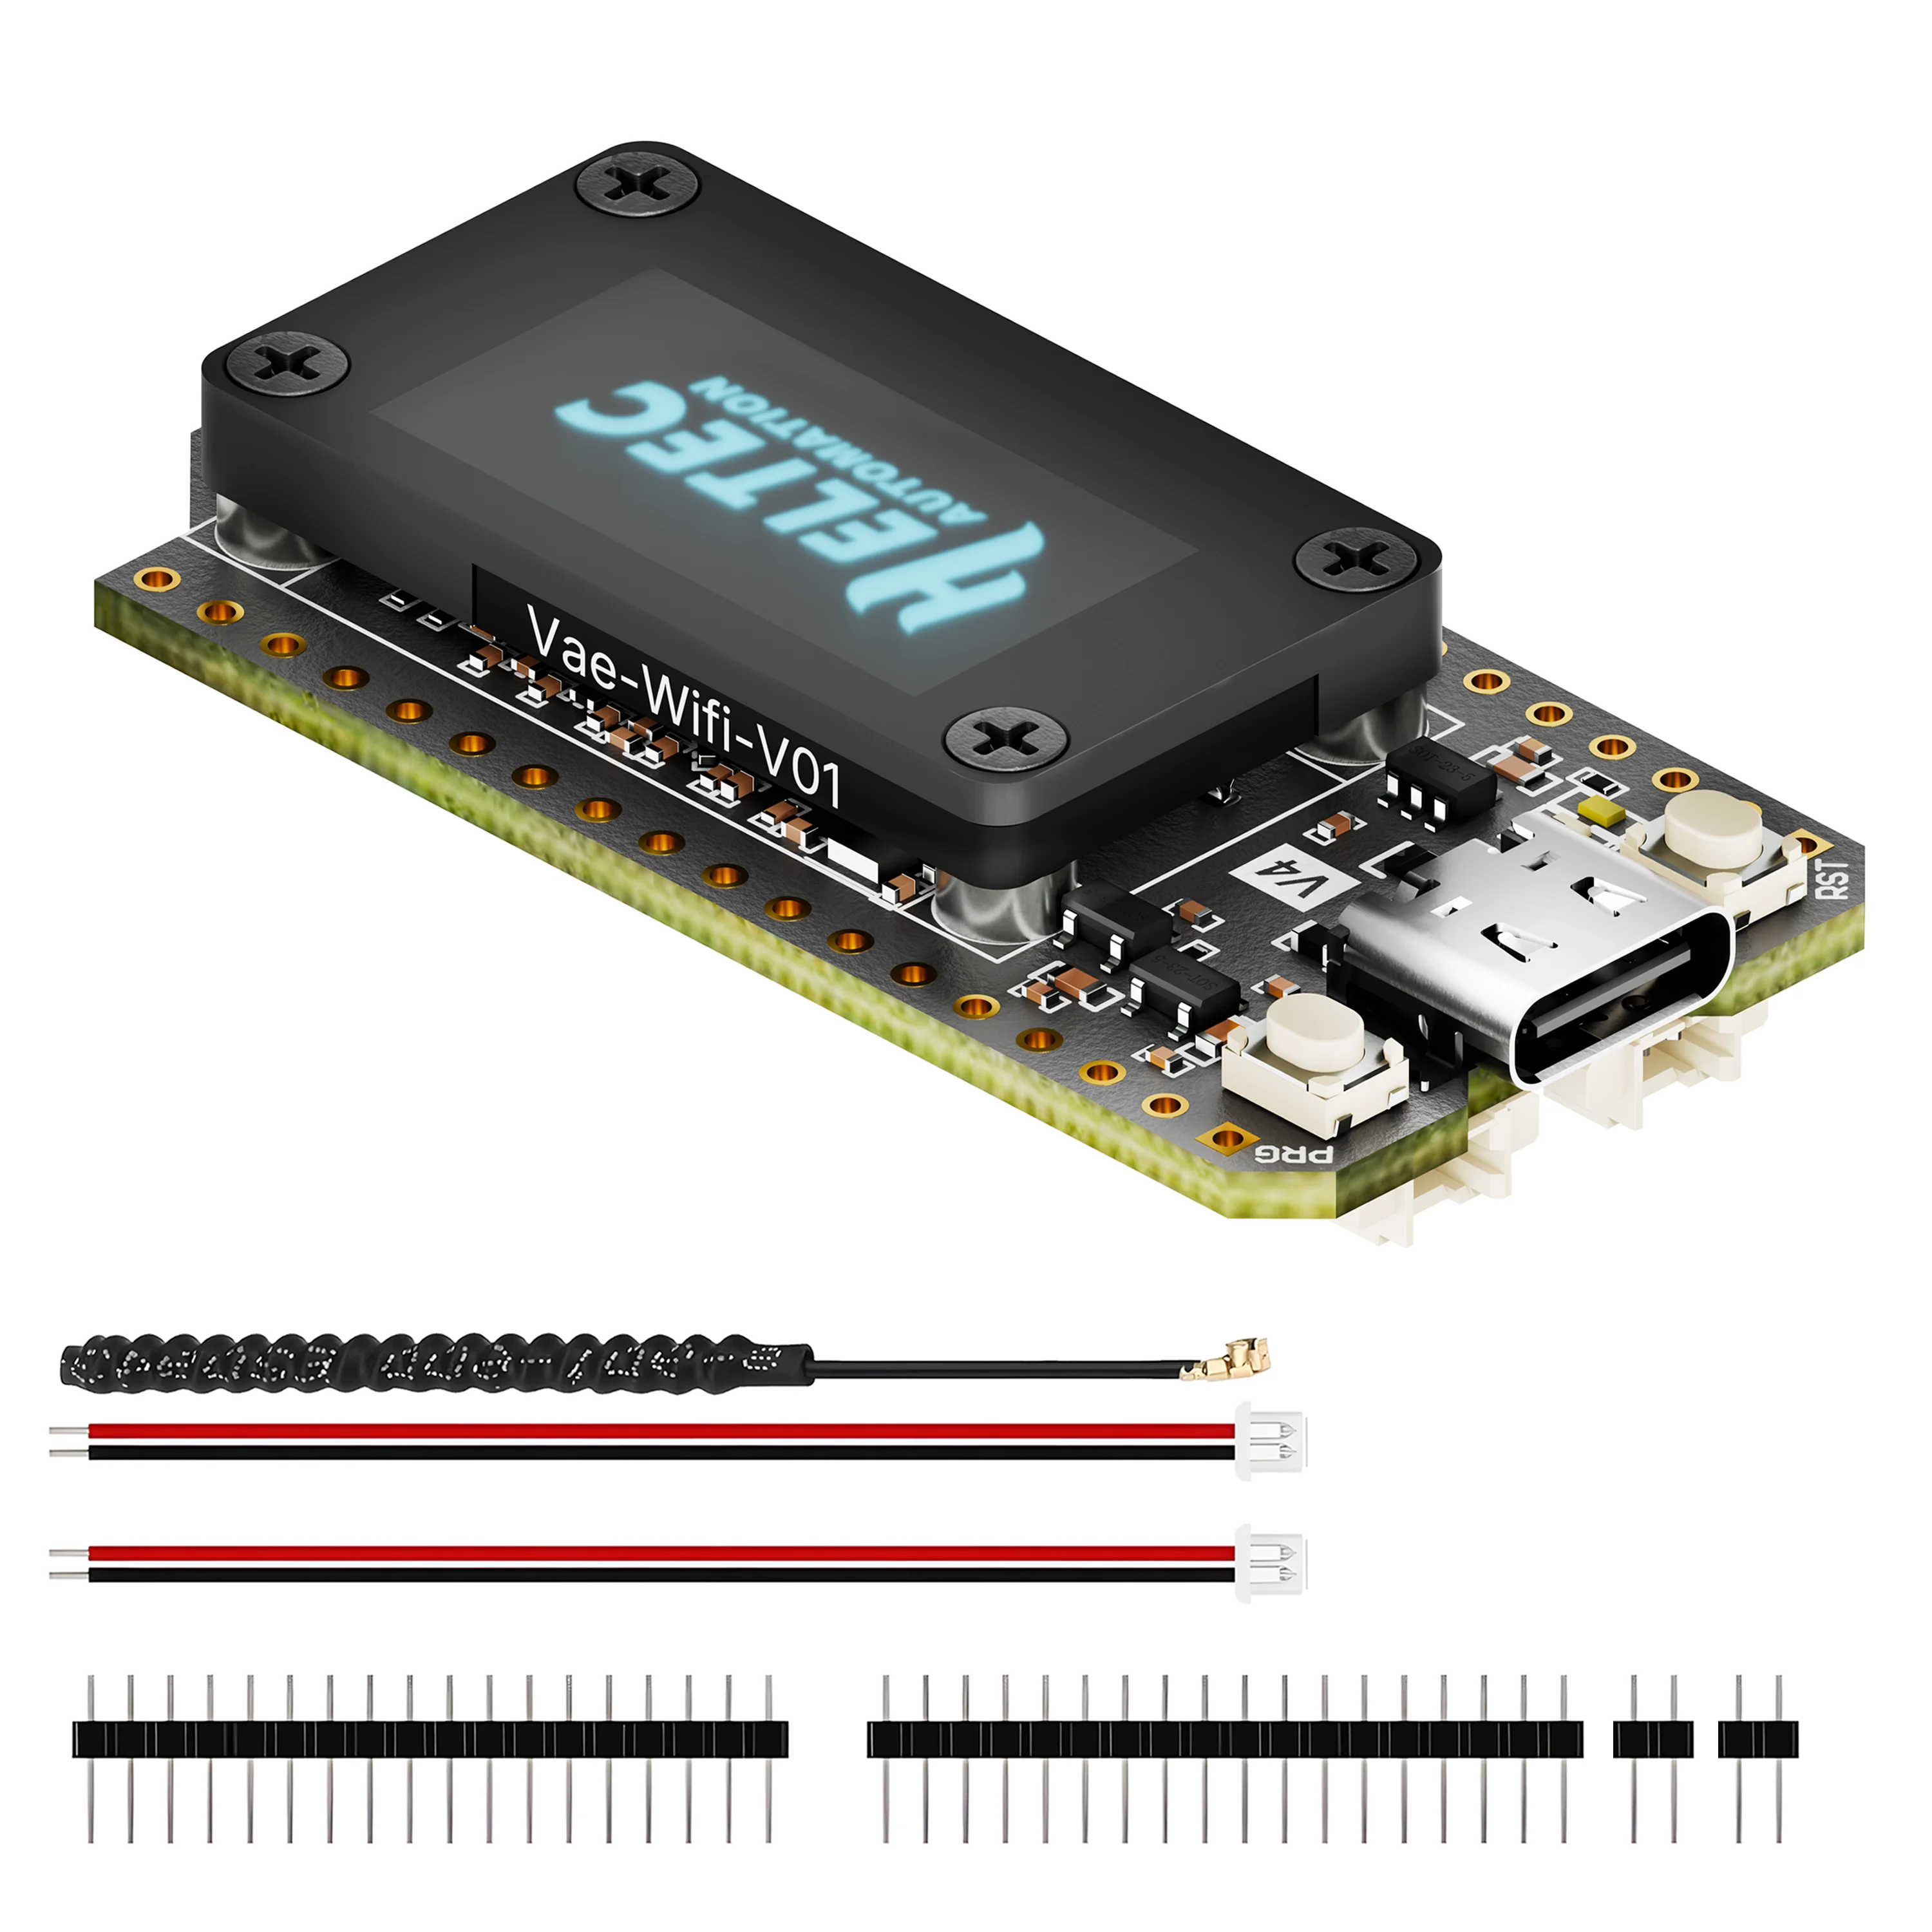
Dimension

Specifications
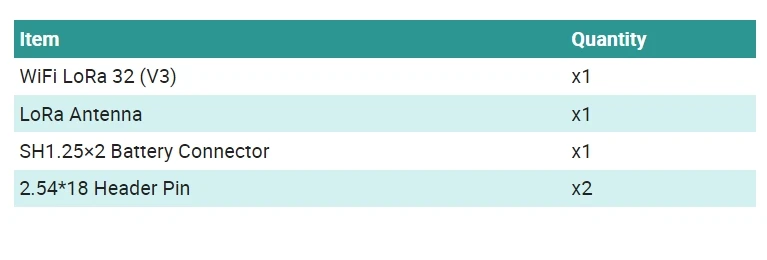
Packing List
The default packing list without selecting any accessories is as follows:
Summary
●More detailed WiFi LoRa 32(V4) introduction-Scan&Watch for more on
Youtube.
https://youtu.be/JRidd85Rm5U?si=RMP22rGAFhoh5dAM
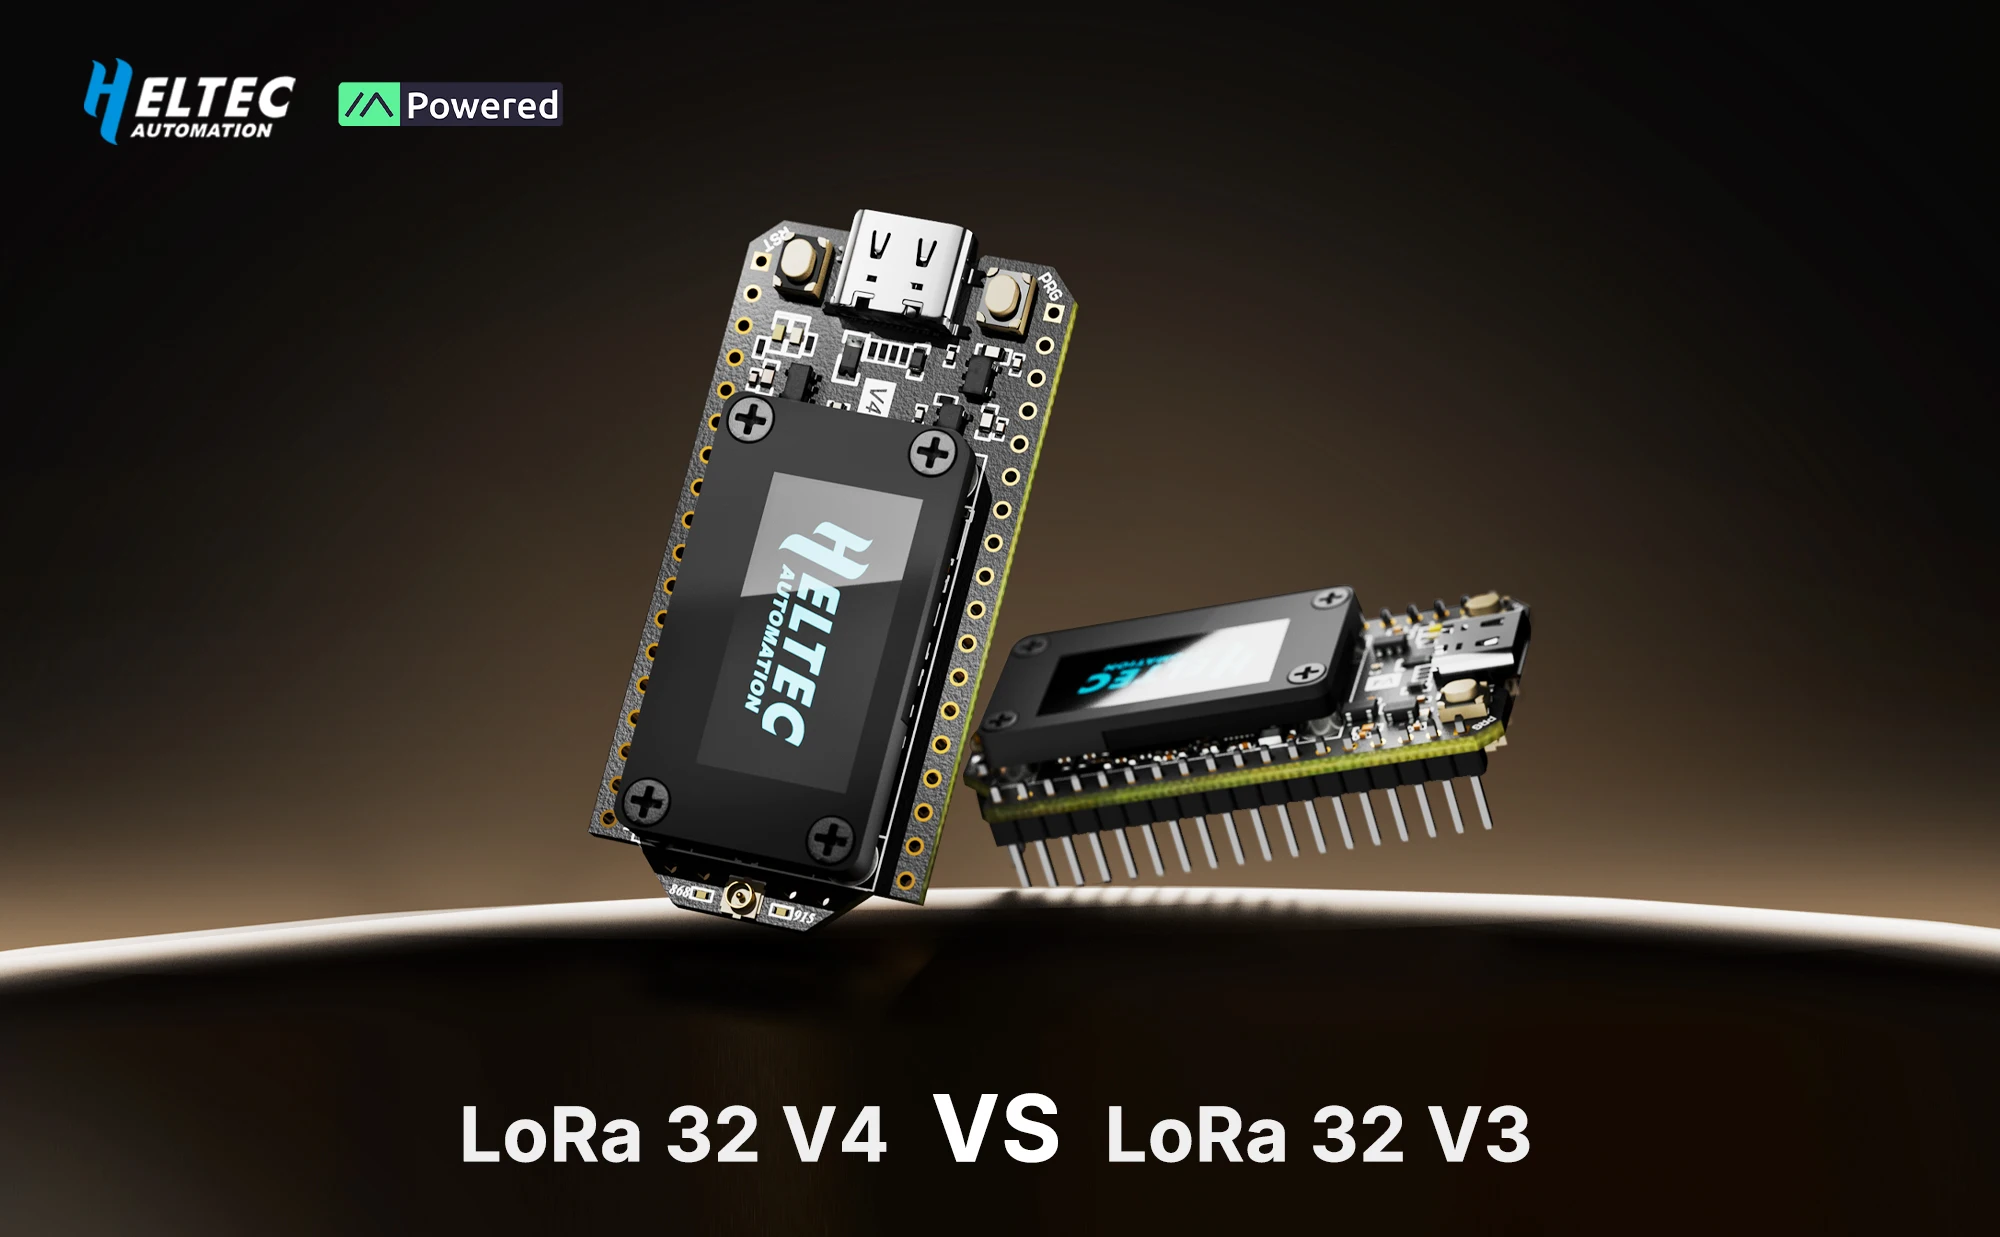
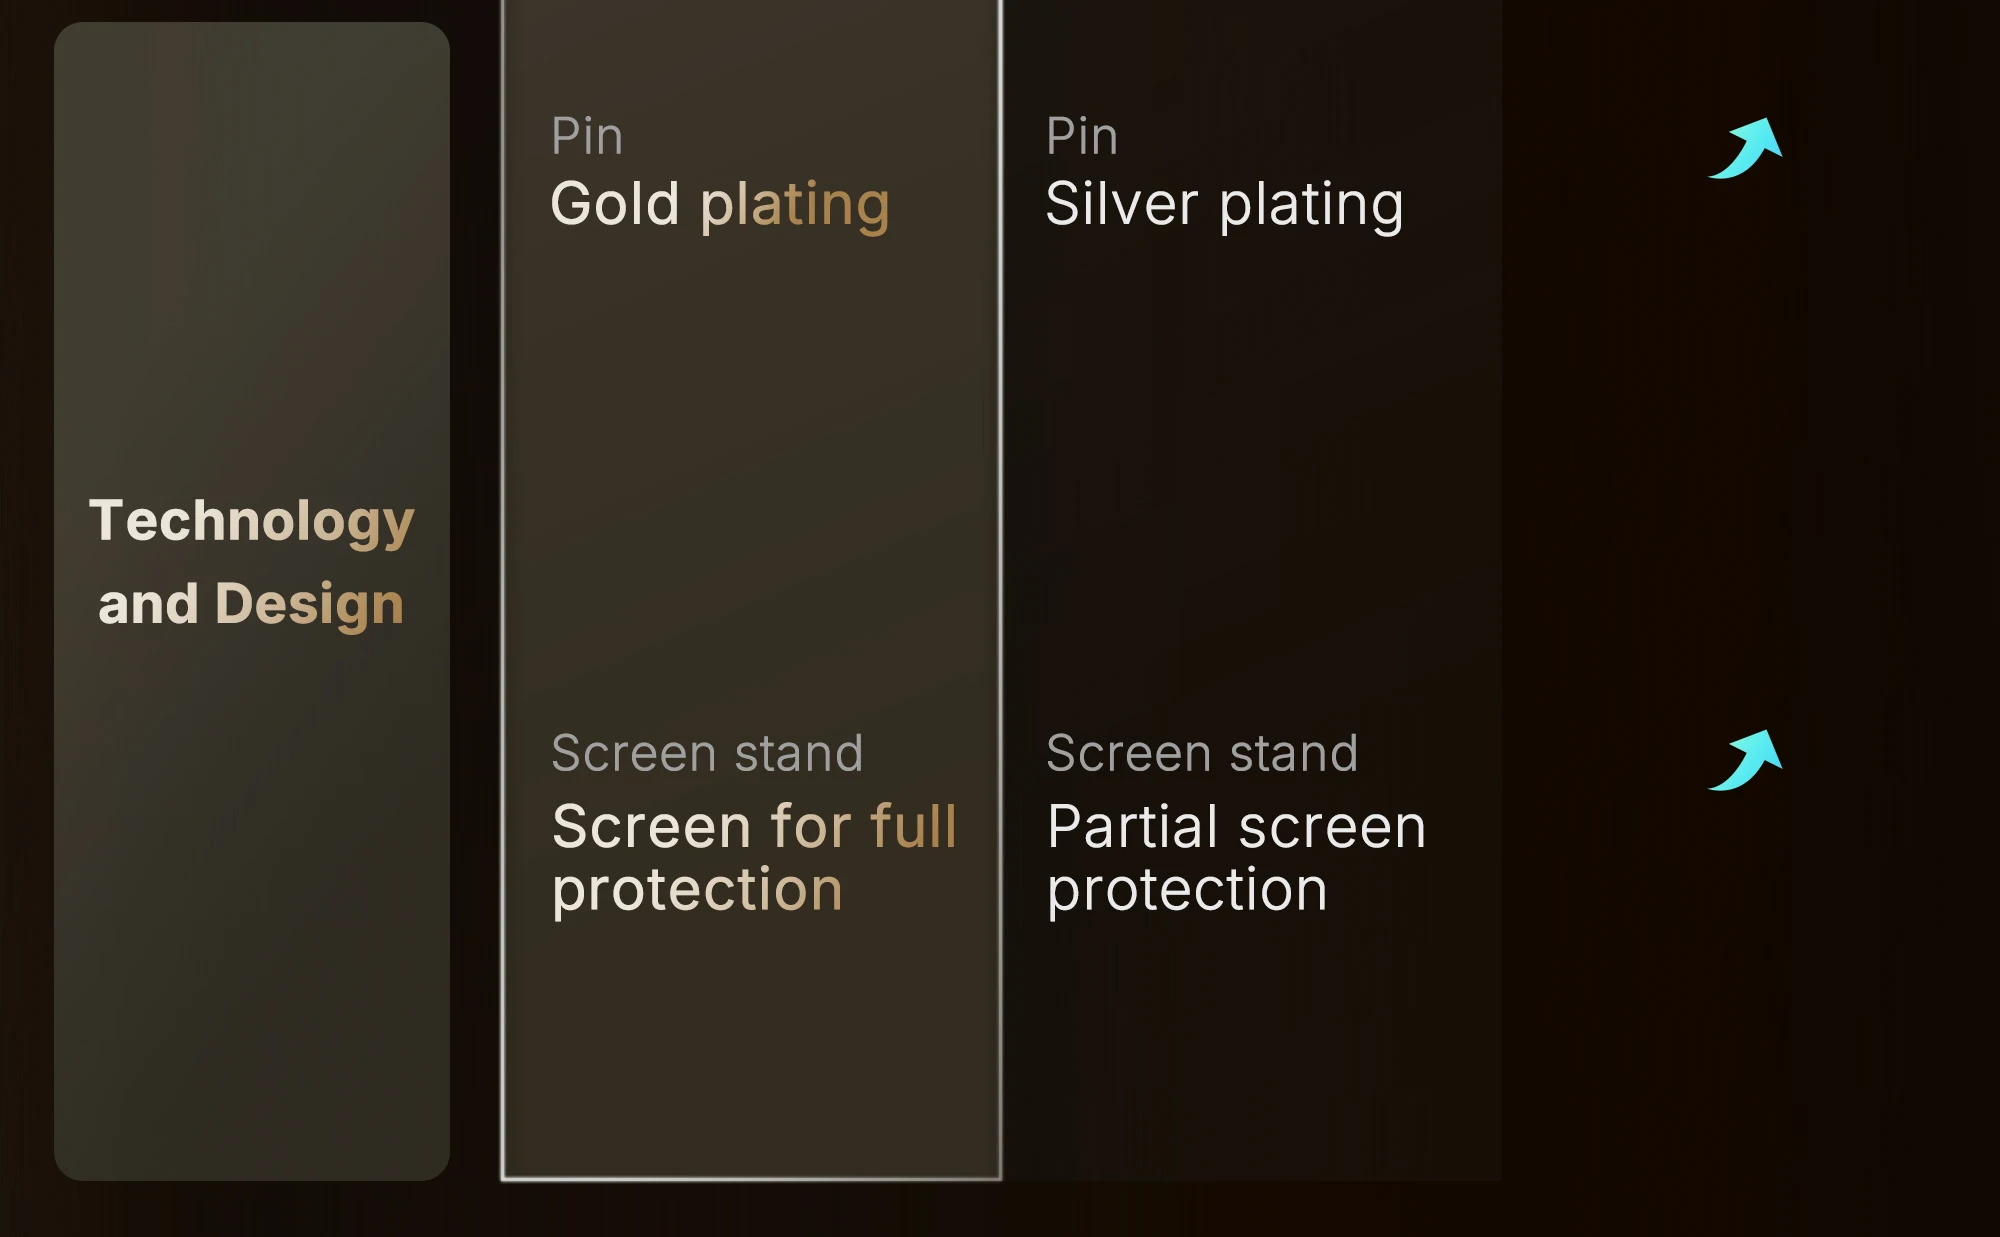
Compared to WiFi LoRa 32 V3 has made the following upgrades:
Specifications
|
|
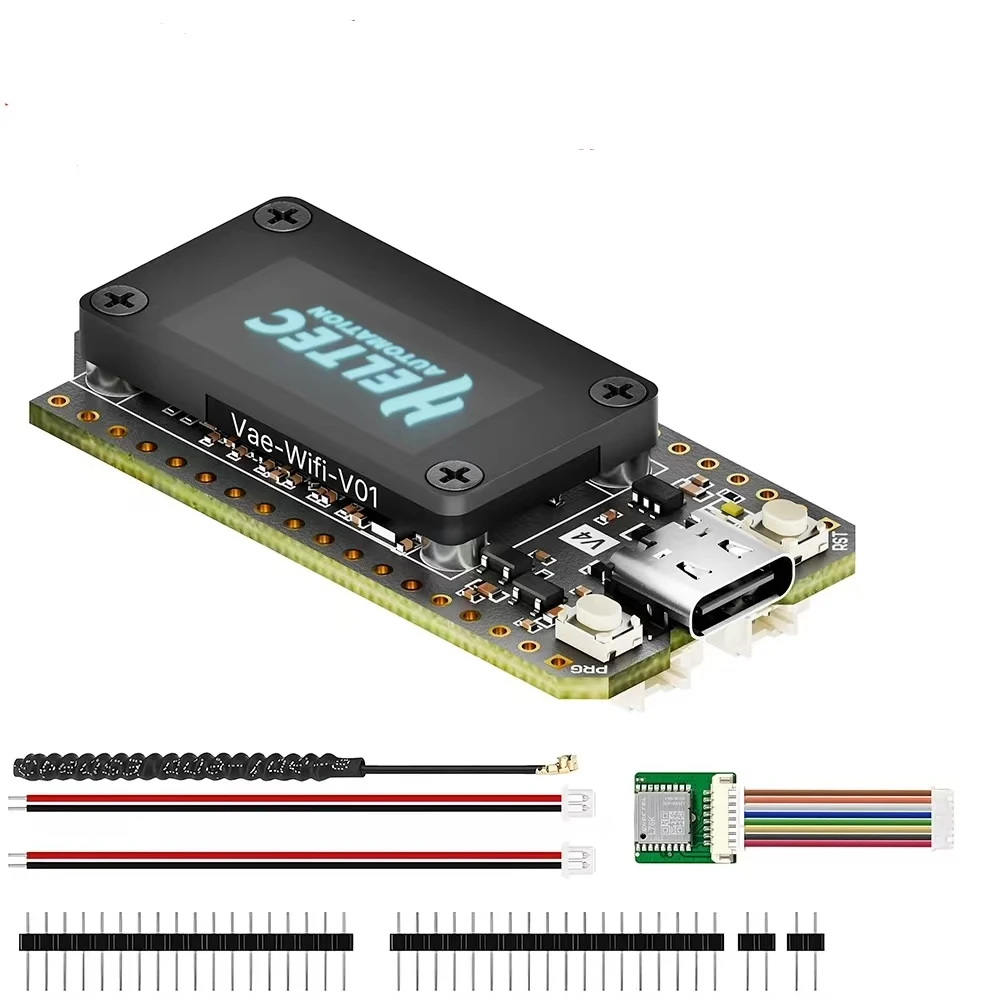
Packing List
The default packing list without selecting any accessories is as follows:
1.Standard configuration (with spring antenna)
2.Standard configuration+GPS module (with spring antenna)
FAQ
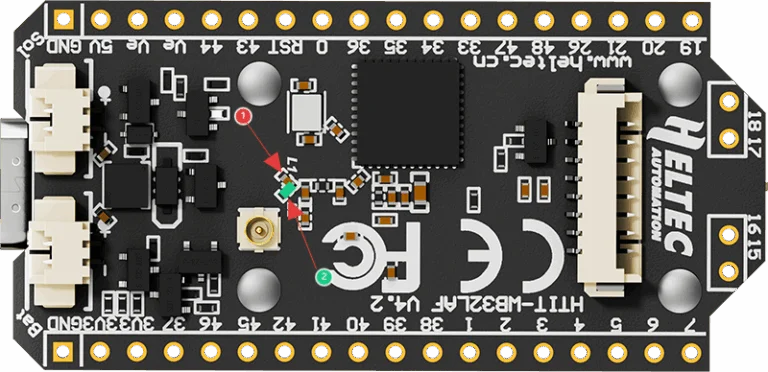
A1: The default 2.4G FPC antenna is located on the side of the plastic screen bracket.
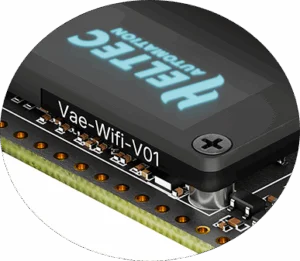
If you wish to use an IPEX-connected 2.4G antenna, you need to remove the inductor marked as ① in
the diagram below, and add a 0-ohm resistor (or other conductive metal or cable) at the position
marked ② to connect to the IPEX interface.
A2:
●Arduino
●Micro Python
●Platform.io
●Espressif IDE
We strongly recommend using Arduino. We have complete technical support and provide complete
LoRaWAN code for ESP32 Arduino framework.
A3: You can find this type of socket by search “SH1.25 x 2”.
A4: Of course, you can contact our sales staff and provide your ideas.
A5: They are compatible in most scenarios.
Since V4 uses the same series of chips as V3, features the same OLED, and has an almost
identical pin layout, V3 and V4 can be used interchangeably in the majority of cases.
However, due to the increased transmit power, the transmit power settings in some code may no
longer correspond directly to the actual output.
Q6: Failed to upload code
A6: Please try the following steps:
1.Try using a different USB cable.
2.Enter BootLoader mode. There are two methods to enter this mode:
●Hold down the PRG button, connect the USB-C cable, then release the PRG button.
●Connect the USB-C cable, hold down the PRG button, press the RST button once, then release
the PRG button.